When it comes to basic audio gear, nothing says “pro” like knowing your gear, even if it’s borrowed.
New to Audio? Here’s the Basic Audio Gear That Won’t Scare You (or Your Wallet).
Let’s face it—stepping into audio for the first time can feel like standing in front of a spaceship’s control panel. So many knobs. So many cables. And a terrifying button labeled “phantom power.”
But here’s the truth: you don’t need to spend thousands on basic audio gear to start learning the ropes. You just need the right beginner-friendly gear that teaches you the fundamentals without frying your brain or your bank account.
We’re here to show you exactly what that gear is—and why AMP by New Life Electronics can grow with you from your first podcast to your first FOH gig.
Start With Tools You Already Own
Before you max out your credit card, raid your tech drawer. Chances are, you already have the basics:
A laptop or tablet
A pair of decent headphones (closed-back preferred)
A USB microphone or headset mic
Free software like Cakewalk, Tracktion, or even GarageBand
These tools are more than enough to begin learning signal flow, basic EQ, and the art of not peaking every track into red.
Quick Tip: Grab a free plugin suite from TDR (Tokyo Dawn Records). They’re professional-grade and completely free.
There are hardware and software tools. Hardware is the most tactile and most consistent, it usually can’t change without getting a new one. Software, however, is much more malleable, and could even change version to version. The point is that you get used to a piece of equipment or software, and you learn how to use it in ways that are not so basic. Just like a carpenter that loves their favorite hammer, you won’t have to think about how to make the tool work, your will level up to focusing on the work that you are doing and beyond. Use what you have available and get to know it well.
As for software tools, look for other free VSTs from well known brands, many are really good for learning what that type of tool does. Eventually, you can grab the premium VSTs that meet your needs exactly, and not get a huge library of ‘never-used-kits’. Although, most software audio people have gone through that phase at some point in their learning adventure. So don’t feel bad if you gather hundreds of gigs of VSTs and samples.
Add-On Basic Audio Gear That Builds Your Skills
When you’re ready to upgrade, look for gear that teaches you as you go. Here’s our recommended low-cost starter kit:
2-in/2-out USB Interface (Focusrite Scarlett Solo, PreSonus AudioBox)
Dynamic microphone (Shure SM58 or Samson Q2U)
Boom mic stand and pop filter
Studio monitors or high-impedance headphones
Small analog mixer or control surface (just to feel those faders!)
AMP supports a wide range of USB and network-based gear, so every piece you add becomes part of your growing rig.
Pro Insight: Don’t chase the “perfect” gear. Focus on clean signal, smart routing, and building confidence. AMP helps you scale without starting over.
Learn to Mix Like a Pro (Even If It’s Just Your Dog’s Bark)
Once you’ve got a mic and a DAW, you’re in business. The best way to learn? Start recording:
Mic an instrument (or a friend who thinks they can sing)
Record a voiceover or a podcast
Create a fake commercial with music and effects
Experiment with EQ, compression, panning, and reverb. Then repeat.
With AMP, you can simulate real-world routing and control on your existing hardware—perfect for prepping for live gigs or broadcast work.
Bonus: AMP runs on touchscreen tablets, letting you build muscle memory on the go. Practice mixing at your kitchen table like a true multitasker.
Turn Basic Audio Gear Into Experience
Owning gear is great. Knowing how to use it under pressure is better.
Use your starter kit in real-world situations:
Offer to record a small event or livestream
Join a church tech team
Volunteer to help a DJ or school production
Every mic check, every monitor mix builds real confidence. And when you’re ready to scale up, AMP is already there, ready to connect with Dante, AES67, and pro-grade interfaces.
Want more foundational knowledge? ProSoundTraining.com is packed with training that’ll turn your curiosity into career power.
Mic’ing Instruments: Your First Real-World Superpower
If there’s one skill that separates button-pushers from true audio pros, it’s microphone placement.
Whether you’re recording an acoustic guitar or mic’ing a snare drum, learning to capture the sound source with clarity is crucial for both live and studio environments. This isn’t just about plugging in a mic—it’s about understanding the physics of sound and how microphone types, placement angles, and room acoustics shape what ends up in your mix.
Start with these basics:
Dynamic mics (like the SM57) are great for close-miking drums and amps.
Condenser mics are perfect for vocals, strings, and acoustic instruments in quieter, controlled spaces.
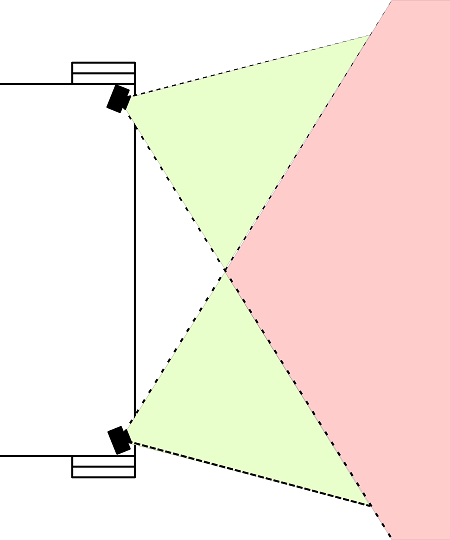
Learn the 3:1 rule to minimize phase issues when using multiple mics.
Quick Technique: Place a dynamic mic 1–2 inches from a snare drum, angled slightly off-axis to reduce harsh overtones. Record and adjust positioning to find the sweet spot.
The more you practice mic’ing real instruments, the more instinctive it becomes. You’ll learn how tone, bleed, and proximity affect your mix—and you’ll start hearing the room as part of the instrument.
AMP makes this easy to explore with its ability to interface directly with your USB or Dante-connected gear, providing real-time feedback on levels and phase alignment.
Build Confidence. Build a Rig. Expand Your Future.
With the right starter gear and the power of AMP behind it, you’re not just learning—you’re leveling up.
Need help designing your first serious rig? Want to rent pro gear for a hands-on trial run?
Because at some point in the path of learning audio, every pro once asked, “What does this button do?”
Think You Need Fancy Gear to Start Learning Audio? Think Again.
Breaking into audio can feel like trying to mic a drum kit in the dark with oven mitts. But here’s the good news—you don’t need a degree, a Neve console, or a truckload of XLR cables to begin.
What you do need is curiosity, initiative, and a few clever ways to get your hands dirty without frying your gear (or your confidence).
Let’s talk about how to get started in audio the smart, fun, and occasionally ridiculous way.
Step 1: Lurk Where the Action Happens (and Be Helpful)
The best learning doesn’t happen in a vacuum—or in a YouTube comment section. If you want real audio chops, start by hanging out where the gear lives:
Church sound teams are often thrilled to have extra hands, especially mid-service when everything hits the fan.
Know a DJ? Offer to help load in, run backup, or babysit the wireless mics at their next wedding gig.
Got a buddy who mixes for a local band, festival, or school event? Ask if you can tag along. Hold a cable. Push a fader. Ask smart (not annoying) questions.
These environments are low-stakes, real-world classrooms where you can observe the chaos, hear what goes wrong, and start connecting theory with practice.
Pro Insight: Always ask before touching anything. And when in doubt, wrap a cable. You’ll be everyone’s favorite rookie.
Step 2: Start With Gear You Already Own
You’d be surprised what you can do with a smartphone, a free DAW, or that dusty USB mic you forgot you had. The key? Start experimenting. Record a friend’s band. Make a podcast. Mic your neighbor’s chainsaw (with permission).
Getting comfortable with signal flow, mic placement, and basic mixing happens through repetition—not buying the “right” gear.
Quick Hack: Download free DAWs like Cakewalk or Tracktion. Pair with free plugins from TDR or Valhalla. Boom, you’re mixing.
Step 3: Learning Audio is about Following the Noise (aka Forums, YouTube & More)
Some of the best audio minds on Earth are in Facebook groups and Reddit threads arguing about phase alignment. Join the party—but listen more than you speak. Try:
r/livesound and r/audioengineering (Reddit)
ProSoundWeb forums
YouTube channels like Curtiss Judd, The Recording Revolution, or Spectre Sound Studios
And don’t forget ProSoundTraining.com — where industry legends share wisdom that can save you years of guesswork.
Bonus Resource: Follow your favorite FOH engineers on Instagram. Many post behind-the-scenes looks at rigs and live setups.
Step 4: Join the Signal Chain to Learn Audio
The longer you hang around audio people, the more gigs you’ll hear about. Don’t be shy. Offer to submix. Run cables. Drive the truck. Do it all with a smile and you’ll get invited back.
Also, build a basic kit: a decent headset, a flashlight, and a bag of labeled Velcro ties. It says, “I’m not here to mess around.”
Gear Starter Pack:
Headlamp (you’ll thank us)
Gaffer tape (not duct tape… ever)
A bag of labeled XLRs
Ready to Crackle Less and Mix More?
If you’re dreaming of flawless live mixes, polished studio tracks, or just want to stop blowing out speakers during soundcheck—let’s talk.
We’ve trained engineers, built custom setups, and equipped churches, schools, and venues with systems that work right the first time.
Audio protocol matters, because great sound shouldn’t rely on hope and guesswork.
Is Your Audio Network Holding You Back?
When it comes to live audio, reliability isn’t optional—it’s everything. Dropped signals, latency, and routing nightmares can derail even the best production. Networked audio protocols are your backbone for a rock solid connection. Whether you’re mixing FOH at a major event or setting up a hybrid conference, poor network infrastructure can turn your show into a support ticket.
The solution? Using modern audio networking protocols that were built for the job—Dante, AES67, and ASIO. These technologies don’t just work; they work together to give you low-latency, scalable, professional-grade control of every signal in your system.
Let’s walk through how these audio protocols are changing the game for live sound engineers and installers alike.
The Audio Protocol Power Trio: Dante, AES67, and ASIO
Dante: The industry darling for good reason. Developed by Audinate, Dante sends uncompressed, multi-channel digital audio over standard Ethernet networks with zero dropouts and low latency. Ideal for live venues, theaters, churches, and multi-room installs.
AES67: Think of it as the universal translator of audio networking. It allows devices from different manufacturers and protocols to speak the same language. AES67 is your ticket to interoperability across gear.
ASIO (Audio Stream Input/Output): This one’s your rock-solid connection on the software side. ASIO minimizes latency between your DAW or digital mixer and your hardware. AMP by NLE taps into ASIO to deliver blazing-fast performance.
Pro Insight: Don’t just stack gear—build your network around gear that speaks Dante and AES67 natively. Bonus points if your system leverages ASIO for ultra-responsive control.
AMP by NLE: Built for Modern Audio Networks
AMP isn’t just compatible with Dante, AES67, and ASIO—it’s optimized for them.
Whether you’re integrating stage boxes, external I/O, or remote control surfaces, AMP allows you to tie everything together without introducing bottlenecks or routing complexity. It runs on off-the-shelf computers and interfaces, giving you full flexibility without locking you into proprietary hardware.
Runs across tablets, touchscreens, and laptops
Supports multi-screen workflows over wired and wireless
Gear Recommendation: For bulletproof Dante integration, pair AMP with RME Digiface Dante or Focusrite RedNet gear.
Why Audio Protocol Matters: Clean, Reliable Sound
Audio networking isn’t about cables anymore—it’s about confidence.
With the right audio protocols and tools like AMP, you don’t have to guess where your signal is going. You know. That means more time mixing and less time troubleshooting.
And when every word counts—from keynotes to Q&As to livestreams—that reliability becomes your competitive edge.
Explore More:ProSoundTraining.com has incredible resources on networked audio, gain structure, and system layout. Worth bookmarking.
⚡ Quick Tips for Audio Network Success
Label Every Endpoint: Logical names = faster troubleshooting.
Use Managed Switches: Enable QoS and VLANs for Dante.
Clock Wisely: Choose one master clock and stick with it.
Test Before Show Time: Run full signal paths pre-event.
Bonus Tip: Store backup scenes on local and remote devices. Just in case.
Your Next Step: Build a System That Just Works
If your audio setup still feels like a balancing act of luck and hope, it’s time to upgrade. AMP, paired with the right protocols, gives you confidence, clarity, and control.
Let’s take your live audio game to the next level.
In a world of corporate presentations, conferences, TED-style talks, and high-stakes panel events, there’s one truth that every live voice audio engineer knows:
If the voice isn’t clear, the message is lost.
You’ve got one shot to get it right—because unlike studio takes, live speech can’t be re-recorded. And in dynamic, unpredictable environments, clarity is everything. That’s where the right VST plugins—running in real time through a platform like AMP by New Life Electronics (NLE)—make all the difference.
Let’s break down how real-time vocal processing with VSTs can take your spoken-word events from average to exceptional.
Why VSTs Belong in Your Rig
Traditionally seen in studio workflows, VST (Virtual Studio Technology) plugins are now showing their value in real-time live environments thanks to platforms like AMP. With modern low-latency DSP and host systems, you can apply surgical vocal enhancements without introducing noticeable delay.
Here’s what that means for your next event:
Instantly clean up mic bleed or harsh sibilance
Add presence and warmth without overloading your PA
Handle unpredictable presenters with dynamic control tools
And the best part? It all happens quietly behind the scenes, making even mediocre mics and tough rooms sound polished and professional.
VST Plugin Essentials for Spoken Word Events
Here’s a pro-tested chain that works wonders for clarity, warmth, and intelligibility:
De-Esser – Tames piercing “S” and “T” sounds without dulling the voice.
Dynamic EQ or Multiband Compressor – Reacts only where needed, tightening up frequency build-ups.
Noise Gate – Controls ambient noise when the speaker isn’t talking.
Transparent Compressor – Smooths out level spikes for better gain control.
Limiter – Final safety net to protect your PA from peaks.
Pro Insight: Look for plugins from brands like FabFilter, Waves, and MeldaProduction—they offer live-stable builds and zero-latency modes perfect for FOH use.
AMP by NLE: A Live Engineer’s Secret Weapon in the Live Voice Production
Running all this processing live requires power and control—and that’s exactly where AMP by NLE shines.
AMP allows you to host and automate real-time VST chains across multiple inputs, with near-zero latency and total routing flexibility. Whether you’re on a laptop or managing a full front-of-house touchscreen rig, AMP scales with your setup.
Compatible with:
Dante, AES67, ASIO networks
Off-the-shelf audio interfaces and control surfaces
Touchscreen workflows and portable control devices
So yes—you can now EQ a keynote speaker’s lav mic from your tablet… while walking the venue.
Check This Out: Want to understand room acoustics and speaker clarity better? ProSoundTraining.com offers deep dives on system tuning and vocal intelligibility. Bookmark it.
⚡ Quick Tips for Real-Time Vocal Polish
HPF Every Mic: Start with a high-pass filter around 80Hz to kill rumble.
Sidechain Compression: Control music bed levels automatically when someone speaks.
Snapshot Scenes: Store presets for different panelists or mic types.
Latency Budget: Keep total VST chain latency under 5ms for natural speech.
Gear Recommendation: Pair AMP with RME or Focusrite interfaces for rock-solid ASIO performance.
Final Word on Live Voice: Clean Voice Is Clear Authority
A clean vocal mix is more than a technical win—it’s the key to delivering ideas with impact. With AMP and the right set of VSTs, you don’t just capture the moment—you shape it.
Let your speakers focus on what they say. Let you handle how it’s heard.
Ever had a live show go south because of unexpected audio issues? Or spent hours in a studio troubleshooting a signal chain? The problem often boils down to one critical concept: signal flow. Understanding how audio moves through your system is the difference between a seamless mix and a chaotic mess.
Whether you’re running a live sound rig, a broadcast setup, or a studio environment, mastering signal flow will make your workflow more efficient, your troubleshooting faster, and your overall sound cleaner. Let’s break it down.
1. What Is Signal Flow?
Signal flow is the path that audio takes from the source (like a microphone or instrument) to the final output (such as speakers or a recording device). Every cable, processor, and mixer in between plays a crucial role.
A typical live sound signal flow looks like this:
Source (Microphone, Instrument, Playback Device)
Preamp (Boosts weak signals to usable levels)
Mixer/Console (Routes and processes audio)
Processing (EQ, Compression, Effects)
Amplifiers (Boosts signal strength for speakers)
Speakers (Final output to the audience)
In a studio, the flow might include audio interfaces, DAWs, and monitor controllers, while a broadcast setup may add streaming encoders and signal distribution networks.
2. How to Optimize the Signal Chain for Clean, Clear Audio
🔹Gain Staging is Everything One of the most critical aspects of signal flow is gain staging—setting appropriate levels at each stage to prevent distortion and noise. Start with a strong but clean signal from your source and make sure each step maintains the right balance.
🔹Keep Your Signal Path Clean
Use balanced cables (XLR, TRS) to reduce noise.
Avoid unnecessary signal processors that add latency.
Organize your cables to prevent signal interference.
🔹Use Submixes for Efficiency Grouping instruments or vocal sections into submixes before sending them to the main mix can give you better control and clarity. This is especially useful in live sound where quick adjustments are needed.
3. Common Signal Chain Mistakes (and How to Fix Them)
❌Plugging Outputs into Outputs → Always match inputs to outputs to prevent signal loss.
❌Ignoring Latency in Digital Setups → When using Dante, AES67, or ASIO-based systems, monitor for latency buildup.
❌Skipping Proper Grounding → A poorly grounded system can introduce hum and interference into your mix.
🔹Pro Tip: Want to dive deeper into system grounding and noise reduction? Check out SynAudCon’s training courses for expert guidance.
4. Building a Reliable Signal Chain for Any Setup
Whether you’re running a small club PA system or a high-end studio, setting up your signal chain properly ensures consistency and reliability.
Live Sound Example: 🎤 Mic → Preamp → Mixer (EQ & Compression) → Amplifier → Speakers
Studio Setup Example: 🎸 Instrument → DI Box → Audio Interface → DAW → Plugins → Monitors
By mastering these setups, you’ll be able to quickly adapt to any audio environment.
Final Takeaway: Master Signal Flow, Master Your Mix
Understanding and optimizing signal flow isn’t just for sound engineers—it’s for anyone serious about great audio. Whether you’re troubleshooting a bad mix, setting up a new system, or fine-tuning your live rig, getting this right saves time, reduces stress, and delivers better sound.
📞Need a consultation on your sound setup? Contact us today and let’s optimize your audio system for peak performance!
Nothing disrupts a live performance faster than bad sound. Whether it’s muffled vocals, piercing feedback, or instruments drowning each other out, a poor audio mix can turn an amazing show into a frustrating experience for both performers and the audience. A good sound check makes all the difference.
That’s why a well-executed live sound check is essential for every live performance. It’s not just about turning knobs and adjusting levels—it’s about crafting an audio experience that elevates the performance. From setting the right balance between instruments to ensuring seamless communication between the sound crew and musicians, every detail matters.
In this guide, we’ll break down the best practices for a professional live sound check, covering pre-check preparation, step-by-step execution, and expert techniques to avoid common pitfalls. And if you want a flawless sound without the hassle, our team of expert live sound engineers is ready to deliver. Let’s dive in.
1. The Purpose of a Sound Check: Why It’s Essential for Every Live Event
A live sound check isn’t just a quick mic test—it’s the foundation of an incredible performance. A proper sound check ensures that every instrument, microphone, and speaker is fine-tuned for clarity, balance, and power. Without it, even the most talented performers can be undermined by technical issues like feedback, muffled vocals, or uneven sound levels.
Why a Sound Check is Non-Negotiable
A thorough pre-show sound check guarantees:
Consistent sound levels across all instruments and vocals, ensuring nothing gets lost in the mix.
Clear, distortion-free audio for both the audience and performers.
Elimination of feedback and unwanted noise before the show starts.
A seamless listening experience that enhances audience engagement.
Skipping this step can lead to avoidable technical failures that could ruin an otherwise perfect performance. Whether you’re hosting a concert, corporate event, or house of worship service, a properly executed sound check makes all the difference.
2. Pre-Sound Check Preparation: Setting the Stage for Success
A flawless live sound check starts long before the first mic is tested. The best sound engineers know that a successful live performance depends on careful planning. Proper pre-show preparation is what separates a smooth setup from a chaotic scramble. Skipping this step leads to technical issues that could have been avoided. Here’s how to get everything in place before the full sound check process begins.
Before any musician steps on stage, every piece of audio equipment should be tested and secured. This means:
✅Inspecting all cables for loose connections or damage. Faulty cables are a major cause of live sound failures.
✅Checking microphones for proper placement and function. Poorly positioned mics lead to unwanted noise and feedback.
✅Testing DI boxes, amps, and power sources to prevent unexpected dropouts during the performance.
✅Configuring the PA system for even coverage throughout the venue to ensure crystal-clear sound for every audience member.
Pro Tip: Have a pre-show checklist to ensure nothing is overlooked. A minor issue during setup can become a major problem once the show starts.
2. Line Check: Every Input Matters in the Sound Check
A line check is different from a full sound check. It’s a quick, technical pass-through of every instrument, mic, and input to confirm everything is routed correctly. Each signal is tested one by one, starting with drums and moving through bass, guitars, keyboards, vocals, and any playback tracks.
Skipping a proper line check can lead to:
Dead channels that don’t transmit sound.
Misrouted audio, where instruments or vocals go to the wrong speakers.
Feedback surprises that are much harder to fix once the show begins.
A few extra minutes here can save hours of troubleshooting later and ensure a seamless live performance.
3. Understanding Venue Acoustics: The Room is an Instrument
Every live sound venue has its own acoustic challenges. A club, theater, or outdoor festival will all respond to sound differently. Before the full live sound check, make sure to:
Walk the venue and identify reflective surfaces that could cause echo or sound distortion.
Locate dead spots where audio might drop out and adjust speaker placement accordingly.
Adjust PA system settings to ensure balanced sound distribution throughout the space.
For outdoor events, consider factors like wind and environmental noise when placing speakers and setting levels. For static venues like a house of worship or concert hall, most of these issues should have been addressed when sound system installation was done. However, periodically checking the space helps identify new challenges—like a dead channel, blown speaker driver, or unexpected sound reflections from new signage or structures.
4. Clear Communication: The Key to a Smooth Sound Check
A great sound check isn’t just about gear—it’s about teamwork. The sound crew, musicians, and event organizers need to work together efficiently. Set clear expectations for:
The sound check schedule so everyone is ready on time.
Who is in charge of communicating adjustments (this is typically the monitor engineer).
How to give feedback efficiently (hand signals, quick verbal cues, or talkback mics).
Pro Tip: Designate one person in the band or crew to communicate with the sound team. Too many voices giving instructions leads to confusion and delays.
3. The Step-by-Step Sound Check Process: Dialing in the Perfect Mix
Once the pre-sound check preparation is complete, it’s time to move into the full sound check process. This step fine-tunes all elements of the live sound system to ensure that every musician hears themselves clearly and that the audience experiences the best possible sound quality.
1. Start with Drums & Bass: Building the Foundation
The rhythm section is the backbone of any live performance. Begin by checking:
✅Snare drum – Adjust for crisp attack without overpowering the mix.
✅Toms & cymbals – Balance for clarity without excessive wash.
✅Bass guitar – Dial in deep, controlled low frequencies that complement the kick drum.
2. Layer in Guitars & Keyboards: Defining the Midrange
Once the rhythm section is solid, bring in the melodic instruments:
✅Electric & acoustic guitars – Ensure presence and clarity without clashing.
✅Keyboards & synths – Balance frequencies to avoid muddiness or sharpness.
3. Vocals Come Last: Ensuring Clarity & Projection
Finally, mix the lead and backing vocals, ensuring they:
✅Cut through the mix without overpowering instruments.
✅Have clear articulation for lyrics to be understood.
✅Are free from feedback and have proper reverb/EQ settings.
4. Monitor Mix vs. Front-of-House Mix: Balancing Sound for Everyone
A great live sound experience means balancing two separate mixes:
Monitor mix – What the performers hear on stage.
Front-of-house mix – What the audience hears.
Each musician may need different levels in their monitors, ensuring they hear themselves and the band clearly without distractions.
4. Common Sound Check Mistakes to Avoid
Even experienced teams can run into avoidable sound check mistakes that lead to frustrating audio issues during a performance. Here are some of the most common pitfalls and how to prevent them:
1. Rushing the Sound Check
Trying to speed through a sound check often results in missing critical issues like bad cable connections, improper mic placements, or imbalanced mix levels.
Solution: Schedule enough time for a thorough check and start early.
2. Ignoring Monitor Mixes to speed up the Sound Check
If musicians can’t hear themselves properly, the entire performance suffers.
Solution: Take time to dial in individual monitor mixes and ensure each performer is comfortable before moving on.
3. Failing to Account for Room Acoustics
A venue’s size, shape, and reflective surfaces impact the sound. Ignoring this can cause echo, dead spots, or feedback loops.
Solution: Adjust EQ and speaker placement to accommodate the space.
4. Not Simulating Performance Volume Levels in the Sound Check
A common mistake is checking at low levels and playing at high levels, which leads to unexpected distortion and mix imbalances.
Solution: Perform sound checks at actual performance volume for an accurate mix.
5. Poor Communication Between Crew & Performers
Miscommunication leads to unnecessary delays and confusion.
Solution: Establish clear hand signals, verbal cues, or a talkback mic system for seamless coordination between the sound team and musicians.
Avoiding these mistakes ensures a smoother, more professional sound check, reducing last-minute stress and creating a flawless audio experience for both performers and audiences.
5. Pro Tips for a Flawless Sound Check
While not every sound check scenario allows for perfection, implementing the following pro tips whenever possible can elevate your live sound to the next level. These strategies help avoid common pitfalls, improve efficiency, and enhance overall audio quality for both performers and the audience.
1. Use a Reference Track to Set a Baseline
Before making adjustments, play a high-quality reference track through the PA system. This helps sound engineers:
✅Identify frequency imbalances in the venue.
✅Set a baseline for EQ and speaker tuning.
✅Ensure the system produces clear, full-range sound before adding live elements.
2. Sound Check at Performance Volume
One of the biggest mistakes is conducting a sound check at low levels, only for the band to play much louder during the show. This leads to:
Unexpected distortion.
Changes in mix balance.
Sudden feedback issues.
Solution: Always run a portion of the sound check at full performance volume to replicate real conditions.
3. Optimize Mic Placement and Isolation
Proper microphone technique can drastically improve clarity and reduce feedback:
✅Use directional mics to minimize bleed from other instruments.
✅Position mics at optimal distances for best pickup and minimal handling noise.
✅Ensure vocalists maintain consistent mic technique to avoid volume fluctuations.
4. Use a Talkback Mic for Efficient Communication
In larger venues or professional setups, a talkback microphone at the mixing console allows the sound engineer to communicate directly with performers. This:
✅Reduces confusion during sound check.
✅Speeds up troubleshooting.
✅Creates a smoother, more professional workflow.
5. Save Presets for Consistency
For venues hosting recurring events, saving mix presets for different bands or speaker configurations can be a game-changer. Digital mixers allow engineers to:
✅Recall previous settings instantly.
✅Reduce sound check time significantly.
✅Maintain consistent sound from one performance to the next.
6. Test Wireless Frequencies to Avoid Interference
If using wireless microphones or in-ear monitors, interference can disrupt an otherwise perfect show. Before starting sound check:
✅Scan for open frequencies.
✅Assign and lock frequencies to prevent unexpected drops.
✅Keep backup wired options in case of interference issues.
7. Simulate a Full Band Mix for Better Balance
Rather than testing one instrument at a time, have musicians play together in small sections. This helps engineers:
✅Adjust EQ and levels in real-time.
✅Balance the mix holistically instead of in isolation.
✅Catch problems early before they become show-stopping issues.
8. Record and Review Sound Check for Adjustments
If time permits, record a section of the sound check and play it back through the PA. This allows for:
✅Identifying tonal issues that might not be noticeable in real-time.
✅Making final EQ tweaks to enhance clarity.
✅Ensuring the sound is well-balanced for both the audience and performers.
By implementing any of these advanced sound check techniques, you’ll create ever more professional, polished, and consistent live sound experiences.
Why Professional Sound Engineers Make the Difference
Even with the best gear and preparation, achieving flawless live sound requires experience, precision, and real-time problem-solving. This is where professional sound engineers make all the difference.
1. Expertise in Audio Balancing & Troubleshooting
Professional sound engineers bring years of experience in balancing frequencies, optimizing mixes, and preventing technical failures. Their trained ears can detect and correct issues that an untrained person might miss, such as:
✅Fine-tuning EQ settings to eliminate muddiness and enhance clarity.
✅Identifying feedback sources and making instant adjustments.
✅Ensuring the right blend between instruments and vocals for a polished, professional mix.
2. Real-Time Adjustments for a Seamless Performance
A live performance is unpredictable—levels change, equipment malfunctions, and environmental factors shift. A professional sound engineer:
✅Continuously monitors and adjusts the mix throughout the performance.
✅Handles unexpected technical issues without disrupting the show.
✅Works closely with performers to ensure optimal monitor mixes, reducing on-stage distractions.
3. High-End Equipment Knowledge & Proper Use
The best audio gear won’t deliver great sound unless configured and operated correctly. Professional engineers:
✅Know how to maximize the potential of mixing consoles, wireless systems, and PA setups.
✅Select and position microphones and speakers for the best possible coverage.
✅Manage complex sound system setups in large venues and outdoor spaces.
4. The Key to a Stress-Free Event
Hiring a professional sound engineer means less stress for performers, event organizers, and production teams. Instead of worrying about technical issues, you can focus on delivering a great show while knowing the sound is in expert hands.
Want flawless live sound for your next event? Our expert sound engineers specialize in creating crystal-clear mixes, eliminating audio issues, and ensuring a seamless experience from setup to performance. Contact us today to learn more!
Conclusion: Bring Your Sound to Life with Professional Expertise
A proper live sound check is the difference between a show that sounds good and one that sounds incredible. By following these best practices, you ensure a seamless performance, happy musicians, and an engaged audience.
But why take chances with your event’s sound? Our team of expert live sound engineers specializes in flawless sound setup, mixing, and troubleshooting, so you can focus on the performance while we handle the technical details.
Don’t leave your sound to chance—contact us today and let’s make your next event unforgettable!
If you need training on your time, head over to SynAudCon. They will help you get the best sound for your events.
How to Troubleshoot Audio Dropouts in Live Productions: A Sound Engineer’s Guide
Introduction
If you’ve worked in live production engineering for any length of time, then you’ve likely encountered nightmare audio dropouts in this scenario: the main output suddenly goes silent in the middle of a show. Then the director, the crew—maybe even the entire audience—turns to glare at you. And it’s not just any glare, but the “Do-you-know-what-you’re-doing?” death stare. So, now what do you do in this high-pressure moment? Hopefully, you’re reading this before disaster strikes not in the crisis moment.
The ability to quickly track down and resolve audio dropouts is one of the reasons you get paid the big bucks. Let’s break down the essential troubleshooting steps to help you fix the problem—fast.
1. Check the Mute and Solo Buttons
This is the easiest and quickest fix, that could save you from a catastrophe from audio dropouts might just be a simple tap. Everyone makes this mistake at some point—brushing a button on the way to adjust another control. If the sound is gone, double-check the mute and solo buttons first. You might just avoid an unnecessary crisis.
2. Follow the Signal Chain to find audio dropouts
If it’s not a mute/solo issue, you’ll need to trace the signal path step by step. Look at the board—are all the signal meters flashing as expected? If a signal suddenly disappears, you need to identify where in the chain the audio dropout occurs.
Here’s a basic signal flow to check:
Inputs (Are mics/instruments sending a signal?)
EQs (Any drastic EQ cuts that could mute sound?)
Aux Sends/Buses (Are the buses routing properly?)
Master Outputs (Is the output going to the right bus?)
Knowing your mixing console’s system flow speeds up this process dramatically.
3. Check Local Connections for the audio dropouts
If the signal flow looks fine, the next step is to inspect physical connections:
Are cables securely plugged into the mixer?
Did a cable come loose on the stage box or snake?
If using wireless, are receivers showing power and links?
Start with the main outputs and work backward. If connections aren’t local to the control booth, ask a stage tech to check backstage cables.
4. Check Power Sources
It might sound obvious, but did you lose power? If your console has no lights, meters, or activity, power loss could be the culprit. Think through these steps to check if the power is affecting you.
Did someone trip over a power cord?
Is the power strip still plugged in?
Did a fuse or breaker trip?
To avoid power-related surprises, use gaffer tape to secure power cables and keep plugs from disconnecting accidentally.
5. Preventative Measures to Avoid Future Issues
A few habits can drastically reduce the chances of mid-show technical failures:
Use fresh batteries in wireless systems before every show.
Run a soundcheck for every channel before the audience arrives.
Follow a consistent startup/shutdown process to ensure nothing is overlooked.
Regularly inspect cables and connections for wear and tear.
These simple steps can help prevent last-minute scrambling when things go wrong.
Conclusion
Losing sound in the middle of a live show is stressful, but having a systematic troubleshooting method makes all the difference. By following these steps, you can quickly diagnose and resolve the issue—before the glares turn into full-blown panic.
Stay calm, work methodically, and keep the show running smoothly!
Call us today for further resources and training. We would be glad to help.
Vocal Focus and Register Management in Large Group Ensemble Balance
As a live performance sound engineer, providing balance to the sound of a large ensemble is both a science and an art. Ensemble balance is managing multiple actors and/or vocalists on stage. Knowing when each character’s voice must be heard clearly at the right moments, maintains a harmonious overall mix. This challenge often comes down to group bussing, gain management, and register balancing. In this article, we’ll explore the best practices for achieving clarity, focus, and dynamics in live ensemble performances.
Understanding the Role of Group Bussing in Ensemble Balance
Group bussing is one of the best tools at your disposal for managing large ensembles. By grouping multiple vocal channels into a single bus, you gain centralized control over their combined volume, EQ, and effects. This simplifies your workflow and ensures consistency across similar voices or roles.
Best Practices for Group Bussing:
Organize by Role or Function: Assign actors or vocalists to buses based on their roles—for example, by lead characters, supporting characters, and chorus. This kind of bussing helps so that you can quickly adjust levels and dynamics for each group during the performance.
Use Submixes for Complex Arrangements: For particularly large ensembles, you can also consider creating submixes for specific sections (e.g., altos, tenors, baritones) and then to route those into a master bus. This approach allows for finer control and the best balancing flexibility.
Apply Effects Strategically: Use subtle reverb or delay on group buses to create depth and cohesion without overwhelming the clarity of individual voices.
Balancing Gain and Volume for Vocal Registers in Ensemble Balance
One of the most challenging aspects of live sound for large ensemble balance is managing the gain and volume across varying vocal registers. Actors and vocalists have different tonal qualities and dynamic ranges, which can create imbalances if not managed carefully. The goal is to bring out each character’s voice at the most appropriate time all the while maintaining an even mix.
Best Practices for Gain and Volume Control:
Set Proper Gain Staging: During soundcheck, make sure you optimize each microphone’s gain. The signal should be strong enough to avoid noise but not so high that it risks clipping. Proper gain staging is the foundation for the best sound clarity.
Use Compression Thoughtfully: Apply compression to even out dynamic differences between vocalists. For leads or soloists, use a lighter compression ratio to retain expressiveness. For ensemble groups, more aggressive compression can help create a unified sound.
Automate Fader Levels: For complex performances, use scene recalls or automation to preprogram fader adjustments for key moments. This ensures the best vocal balance without needing constant manual intervention.
Achieving Vocal Focus
In large ensembles, vocal focus refers to ensuring the audience’s attention is drawn to the right voice at the right time. This is especially important in theatrical productions, where the story hinges on dialogue and character interactions. The clarity of those interactions are crucial in the audio. Ensemble balance can be tricky to setup and maintain, but here are some ideas to help you.
Best Practices for Vocal Focus:
Prioritize Lead Vocals: Use EQ and volume adjustments to make lead vocals stand out. For example, boost midrange frequencies to enhance vocal intelligibility and presence.
Duck Background Vocals: Sidechain compression is an excellent technique for momentarily lowering the volume of background vocals or instruments when lead vocals are active. This ensures the best clarity for critical lines.
Layer with Panning: Use panning to create spatial separation between voices. Placing supporting vocals slightly off-center can help leads remain the focal point while maintaining a full stereo image.
Managing Register Balance
Different vocal registers—such as soprano, alto, tenor, and bass—present unique challenges in a mix. Higher registers dominate if not controlled and lower registers get lost in the overall sound. Maintaining ensemble balance is crucial to giving room to each register and voice.
Best Practices for Register Balancing:
EQ for Register Clarity: Use EQ to carve out space for each register. For example, roll off low frequencies on sopranos to avoid muddiness and add warmth to basses by boosting low-mid frequencies. Strive for the best tonal separation.
Adjust Dynamics per Register: Set compression thresholds and ratios based on the dynamics of each register. Softer voices may need more compression to maintain consistency, while naturally powerful voices require less.
Consider Register Overlap: Be mindful of overlapping frequencies between registers. Use narrow EQ cuts to minimize conflicts and maintain the best definition for each voice.
Common Challenges and Solutions
Mic Bleed: In ensemble settings, microphones can pick up unwanted sounds from nearby sources. Use directional microphones and careful placement to minimize bleed.
Solution: High-pass filters can help reduce low-frequency bleed, and gates can be used to suppress unwanted noise.
Stage Dynamics: Actors and vocalists may move unpredictably, affecting microphone pickup and balance.
Solution: Use wireless microphones with consistent polar patterns and monitor levels closely throughout the performance.
Feedback Control: Large ensembles increase the risk of feedback due to the number of open microphones.
Solution: Use feedback suppressors and carefully manage microphone gain to maintain the best balance between volume and stability.
Conclusion
Balancing large ensembles for vocal focus and register is a demanding but rewarding aspect of live performance sound engineering. Ensemble balance is an art that is structured in several skills. By mastering group bussing, optimizing gain and volume, and focusing on vocal clarity, you can deliver the best audio experience for both performers and audiences. With preparation, practice, and the right tools, you’ll elevate every performance to its fullest potential, ensuring that every voice is heard at its best.
We can help you work out a system or train your team to handle ensemble balance. Contact us to make your next performance your best!
In the fast-paced world of live performances, sound engineers carry the vital responsibility of ensuring that every note, lyric, and sound effect reaches the audience in perfect clarity. A cornerstone of this craft is mastering channel control — an essential skill for creating a balanced and immersive audio experience. Whether you’re managing a rock concert, a theatrical production, or a corporate event, channel control is the key to unlocking the full potential of your stage elements and delivering the best possible audio experience.
What Is Channel Control?
Channel control refers to the management of individual audio channels on a soundboard or digital mixer. Each microphone, instrument, and playback device connected to the sound system is assigned a channel, giving the engineer precise control over its volume, EQ (equalization), dynamics, and effects. By fine-tuning these parameters, sound engineers can ensure that every element of a performance sounds cohesive and professional, providing the best auditory experience for the audience.
Why Channel Control Matters for Live Performances
Live performances are dynamic and unpredictable, requiring sound engineers to adapt to changing conditions on the fly. Mastering channel control can enable several things:
Clear Vocal Presence: Ensuring that vocals cut through the mix is crucial for audience engagement.
Instrumental Balance: Avoiding clashes between instruments by managing their volume and EQ ensures a harmonious mix.
On-Stage Communication: Monitoring channels allow performers to hear themselves and others clearly, enhancing their ability to perform.
Adaptability: Quick adjustments to unexpected issues, such as feedback or malfunctioning equipment, minimize disruptions and maintain the best sound quality.
Tips for Effective Channel Control
Organize Your Channels Logically Begin by labeling each channel clearly and grouping similar elements together. For example, group vocals, guitars, percussion, and playback devices into separate sections on your mixer. This organization helps you locate and adjust channels quickly, especially in high-pressure moments, ensuring the best workflow efficiency.
Utilize Submixes Submixes allow you to control groups of channels as a single unit. For instance, you can adjust the overall drum kit volume without tweaking individual microphones on the snare, toms, and cymbals. This technique streamlines your workflow and ensures the best overall mix quality.
Optimize Gain Staging Proper gain staging ensures that each channel’s signal is neither too weak nor too strong. Begin by setting the input gain for each channel so it peaks just below the clipping threshold. This creates a clean, noise-free foundation for further adjustments, ensuring the best sound clarity.
Apply EQ Thoughtfully Use equalization to carve out space for each channel in the mix. For example, cut low frequencies on vocal channels to reduce muddiness and boost midrange frequencies to enhance clarity. Avoid excessive EQ boosts, which can introduce distortion, and aim for the best tonal balance.
Balance Dynamics Compressors and limiters are invaluable tools for managing dynamics. Use compression to smooth out variations in volume, ensuring consistency without sacrificing expressiveness. Apply limiters to prevent sudden spikes that could damage speakers or cause discomfort to the audience, delivering the best dynamic control.
Incorporate Effects Tastefully Reverb and delay can add depth and character to your mix, but overuse can muddy the sound. Apply effects sparingly and tailor them to the performance style—a subtle reverb might suit a theatrical production, while a longer delay could enhance a guitar solo. Strive for the best balance of effects to suit the event.
Monitor Continuously Keep an eye on your meters and listen critically throughout the performance. Headphones and in-ear monitors are essential tools for detecting issues that might not be apparent in the main mix, ensuring the best real-time adjustments.
Anticipate Stage Movement Performers often move around the stage, affecting microphone pickup and audio levels. Anticipate these changes and adjust your channels proactively to maintain the best balance.
Common Challenges to Mastering Channel Control and How to Overcome Them
Feedback Issues Feedback is the bane of live sound engineers. To prevent it, use directional microphones and position them carefully to avoid pointing toward speakers. Adjust EQ to cut problematic frequencies and use feedback suppressors if necessary, ensuring the best audience experience.
Unpredictable Performances Some performers may deviate from rehearsed positions or play louder than expected. Prepare by setting safety margins in your mix and communicating with performers during sound checks, ensuring the best readiness for surprises.
Technical Failures Equipment can fail at the worst moments. Always have backup microphones, DI boxes, and cables on hand. Redundant systems for critical channels ensure the show goes on with the best contingency planning.
The Future of Mastering Channel Control: Digital Mixers and Automation
Modern digital mixers have revolutionized channel control by offering features like scene recall, remote control via tablets, and advanced processing capabilities. Scene recall allows engineers to save and recall settings for different parts of a performance, minimizing transition times. Automation tools, such as dynamic EQ and smart gain adjustments, further enhance efficiency and precision, ensuring the best technological advantages.
Conclusion
Mastering channel control is an indispensable skill for live performance sound engineering. By organizing your channels, optimizing settings, and adapting to challenges, you can deliver the best audio experience for both performers and audiences. Whether you’re working with a seasoned band or a theater production, a deep understanding of channel control will set you apart as a professional sound engineer. With practice, preparation, and the right tools, you can turn any live performance into an unforgettable auditory experience.
If you would like more information, then send us a message. We would be glad to help.
Master the art of live event sound engineering with these expert tips.
Great sound can make or break a live event, whether it’s a concert, play, or corporate presentation. If your audience experience is important to you, here’s how to ensure your next event sounds amazing:
1. Choose the Right Equipment for Live Events
Your venue size, acoustics, and event type all influence the type of equipment you’ll need. A small acoustic set may not need as much amplification. A large concert may need several layers of amplification. The number of details can get very complex with trade offs, however we can help. Check in with us and our experts can help.
Poor speaker placement can lead to uneven sound especially when there are several hindrances to good sound. When placing the speakers around the venue, aim for balanced coverage that avoids echo or dead zones.
If you have an important event, then you need to have it happen smoothly and without hitches. We would be glad to give your event our best!
Always schedule a thorough sound check before the event. This time is the best time to troubleshoot and fine-tune and it will make a huge difference for the actual production. Knowing how a microphone will respond to a vocalist at full voice level makes surprises much less likely then the audience will have a much better experience. We can supply expertise for you next super charged event.
4. Hire a Professional Sound Engineer for Your Live Event
Nothing beats having an expert on-site to monitor and adjust sound in real time when your event is live. A professional engineer has the experience to quickly identify and anticipate problems and then make the appropriate adjustments. Their experience smooths out the audience experience which makes the event great.
🎤 Need help with your next event? New Life Electronics offers full-service audio engineering and equipment rental to make your event successful and successful events will make audiences return.